


TL;DR:
- Homemade dog food allows full control over nutrients and ingredients, ensuring complete, balanced meals. Proper weighing, cooking, supplementing, and storage are essential for safety and nutritional quality. Transitioning gradually over two weeks prevents gastrointestinal upset and promotes long-term health.
Homemade dog food preparation is the practice of cooking whole, measured ingredients at home to meet your dog’s complete daily nutritional needs. Done correctly, a step by step homemade dog food routine gives you full control over protein sources, carbohydrate quality, and supplement ratios in a way no commercial kibble can match. Homemade meals can cost under $2.00 per serving for a medium-sized dog when you batch cook with whole foods like chicken, rice, and lentils. The process requires a digital scale, a clear understanding of AAFCO nutrient profiles, and a consistent preparation routine. This guide covers every stage: ingredient selection, cooking, supplementation, storage, and transitioning your dog off commercial food.
What ingredients and tools do you need for balanced homemade dog food?
Balanced homemade dog meals require three macronutrient categories: lean protein, digestible carbohydrates, and fiber-rich vegetables. Safe protein sources include boneless chicken thighs, ground turkey, lean beef, and cooked salmon. Carbohydrates like white rice, sweet potato, and rolled oats provide energy and digestibility. Vegetables such as steamed carrots, green beans, zucchini, and spinach supply micronutrients without adding excess calories.
Supplements are not optional. Homemade diets must meet AAFCO or NRC nutrient profiles to prevent long-term health issues, and whole ingredients alone rarely achieve this. A standard supplement stack for most adult dogs includes calcium carbonate or ground eggshell powder, fish oil for omega-3 fatty acids, and a canine-specific multivitamin. Without these, even a diet built from high-quality whole foods can cause systemic deficiencies over months.
Kitchen tools you need before you start
| Tool | Purpose |
|---|---|
| Digital kitchen scale | Weighs ingredients by gram for nutrient accuracy |
| Large stockpot or slow cooker | Cooks protein and carbohydrates in bulk |
| Steamer basket | Preserves nutrients in vegetables during cooking |
| Airtight glass containers | Refrigerates portioned meals safely for up to 4 days |
| Vacuum sealer | Extends frozen shelf life to up to 1 year |
| Feeding journal or app | Tracks daily intake, transitions, and supplement doses |
Measuring by weight with a digital scale is more accurate than volumetric measurements because ingredient density varies. A cup of cooked chicken and a cup of raw chicken weigh very differently, and that gap compounds into real nutrient imbalances over time.
Pro Tip: Check the Mindfulbotany safe ingredients guide before building your first recipe. Several common human foods, including onions, grapes, and xylitol, are toxic to dogs and must never appear in homemade meals.
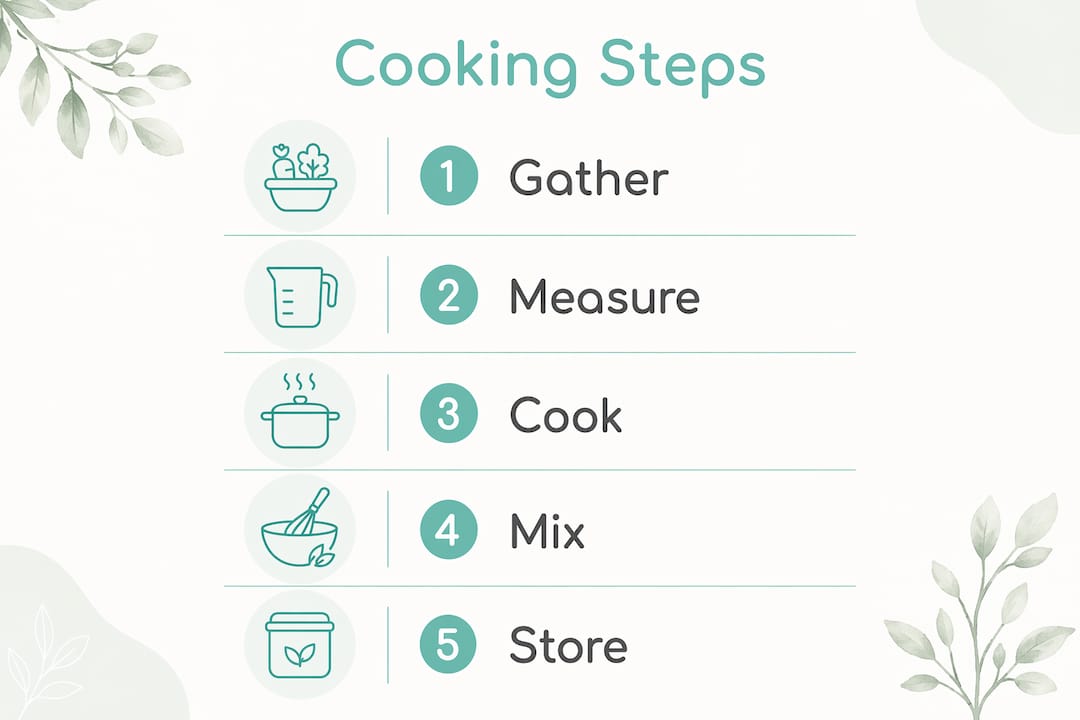
How do you cook homemade dog food step by step?
This is the core process. Follow each step in order to produce safe, nutritious, and consistent meals for your dog.
-
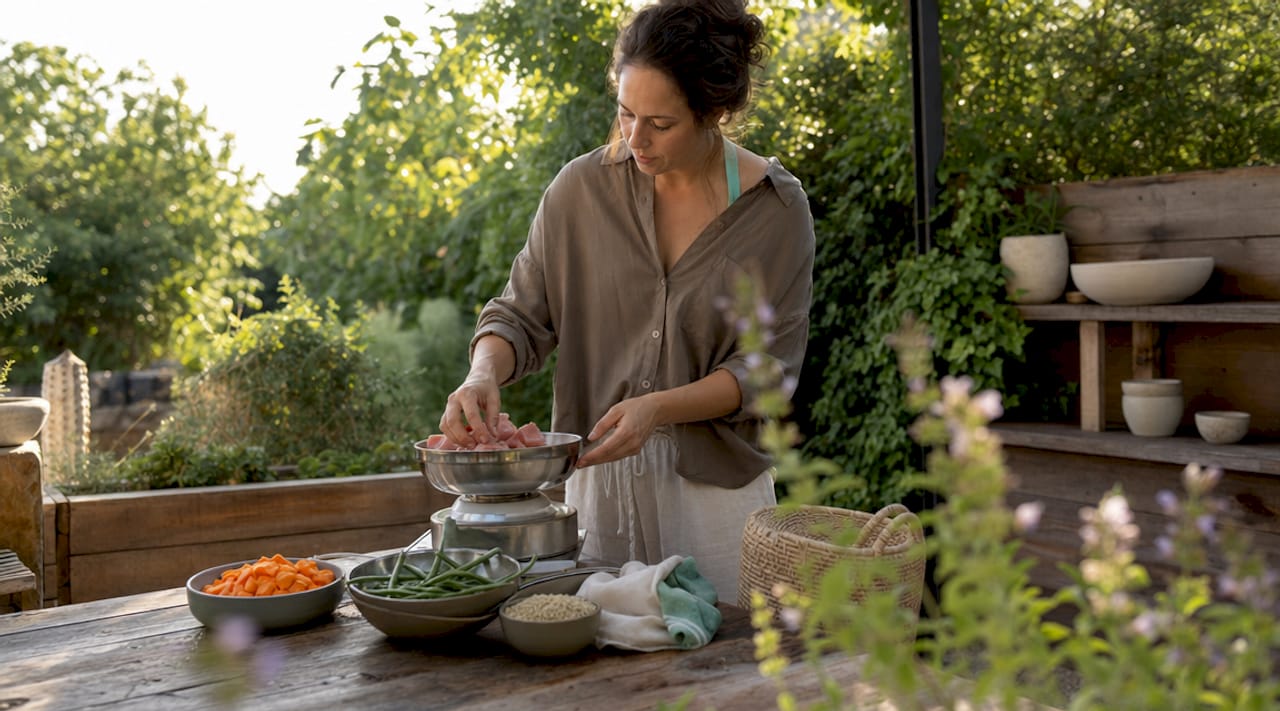
Weigh all ingredients before cooking. Use your digital scale to measure protein, carbohydrates, and vegetables in grams according to your recipe. Eyeballing portions is the most common cause of nutrient drift in homemade diets.
-
Cook protein thoroughly. Boil, bake, or slow-cook boneless chicken, turkey, or beef until fully cooked through. Internal temperature should reach 165°F for poultry and 160°F for ground beef. Remove all bones before mixing.
-
Cook carbohydrates separately. Prepare white rice, sweet potato, or oats in plain water with no salt, butter, or seasoning. Dogs do not need flavor additives, and many common seasonings are harmful.
-
Steam vegetables lightly. Use a steamer basket rather than boiling to retain water-soluble vitamins. Carrots, green beans, and zucchini need only 5 to 7 minutes of steaming. Avoid raw cruciferous vegetables like broccoli in large amounts, as they can cause gas.
-
Cool all components before combining. Spread cooked food in a thin layer on a baking sheet or place the pot in an ice bath. Food left between 40°F and 140°F doubles bacteria every 20 minutes, so cooling within 2 hours is mandatory for safety.
-
Combine and portion into servings. Mix protein, carbohydrates, and vegetables in the ratios your recipe specifies. A common starting ratio for adult dogs is 40% protein, 30% carbohydrates, and 30% vegetables by weight, though this varies by breed, age, and health status.
-
Add supplements at serving time, not before freezing. Fish oil and canine multivitamins must be added fresh at each meal to preserve potency. Freezing degrades certain vitamins and oxidizes fish oil, reducing their effectiveness.
-
Label and store immediately. Refrigerate portions for the next 4 days and freeze the rest. Label each container with the date and contents.
Pro Tip: Batch cooking once per week saves significant time. A single 45 to 60 minute session with a large stockpot and a slow cooker can produce a full week of meals for a medium-sized dog. Refer to Mindfulbotany’s fresh food preparation guide for batch-cooking templates.
How should you store and serve homemade dog food safely?
Proper storage is where many owners lose the nutritional and safety gains they built during cooking. The rules are straightforward and non-negotiable.
Refrigerated homemade meals stay safe for up to 4 days in airtight containers. Glass containers outperform plastic for this use because they do not absorb odors or leach compounds into food over repeated heating cycles. Freeze anything beyond the 4-day supply immediately after portioning.
| Storage Method | Safe Duration | Key Condition |
|---|---|---|
| Refrigerator (airtight container) | Up to 4 days | Must be cooled within 2 hours of cooking |
| Freezer (standard zip bag) | Up to 3 months | Remove excess air before sealing |
| Freezer (vacuum sealed) | Up to 1 year | Store at or below 0°F |
| Frost-free freezer | Shorter than standard | Temperature cycling degrades quality faster |
Vacuum sealing before freezing preserves nutritional quality substantially better than standard zip bags. Frost-free freezers cycle temperatures automatically, which means homemade food stored in them degrades faster. If you use a frost-free model, plan to use frozen portions within 2 to 3 months rather than the full year.
Serve food at room temperature or slightly warmed. Cold food straight from the refrigerator can cause digestive discomfort in some dogs, particularly smaller breeds. Warm the portion in a microwave-safe glass container for 20 to 30 seconds, stir, and check the temperature before serving. Add fish oil and any powdered supplements directly to the warmed portion just before placing it in the bowl.
Pro Tip: Label every frozen portion with the batch date and the dog’s name if you have multiple pets. Mindfulbotany’s storage best practices guide covers container selection and freezer organization in detail.
How do you transition your dog from commercial food to homemade meals?
A gradual diet transition over 7 to 14 days prevents digestive upset. Roughly 1 in 3 dogs experience GI upset if switched abruptly from commercial to homemade food. The transition schedule below applies to most healthy adult dogs.
- Days 1 to 3: Serve 75% commercial food and 25% homemade food by weight at each meal.
- Days 4 to 6: Shift to 50% commercial and 50% homemade.
- Days 7 to 9: Move to 25% commercial and 75% homemade.
- Days 10 to 14: Serve 100% homemade food.
For dogs with sensitive stomachs or a history of food allergies, extend each phase by 2 to 3 extra days. The Mindfulbotany allergen-free dog food guide provides specific protocols for dogs with known sensitivities.
Watch for loose stool, vomiting, excessive gas, or a sudden drop in appetite during any transition phase. These signs mean the pace is too fast. Return to the previous ratio for 2 to 3 days before advancing again.
Treat management matters more during transitions than at any other time. Treat calories should stay below 10% of total daily calories to prevent nutritional imbalance. Excess treats dilute the carefully balanced nutrients in your homemade meals and can mask GI symptoms by introducing new ingredients simultaneously.
Track daily intake, stool quality, and energy levels in a feeding journal. A simple notebook or a free app like Dog Care works well. Feeding frequency guidelines for 2026 recommend two meals per day for most adult dogs, which also makes the transition ratio math easier to manage. Consistent hydration throughout the transition supports digestion, so always provide fresh water alongside meals.
Why I think most owners overcomplicate the first batch
The biggest barrier I see is not time or cost. It is the belief that homemade dog food requires culinary skill or a veterinary degree to execute. It does not. What it requires is precision and consistency, two things any owner can build with a digital scale and a reliable recipe.
Owners consistently underestimate the nutritional engineering required for a complete diet. But the solution is not complexity. It is using a vet-formulated recipe from the start and adding the correct supplements every single time. Skipping calcium or fish oil once a week adds up to real deficiencies over months.
The other misconception is that topping commercial kibble with homemade food counts as a transition. It does not. Total daily calories and nutrients must be accounted for across the entire meal, not just the homemade portion. Mixing without tracking creates unpredictable nutrient ratios that can cause problems over time.
Batch cooking on Sundays for 45 to 60 minutes is the lifestyle model that actually works long-term. Treat it like meal prep for yourself. The AAFCO and NRC nutrient profiles are your recipe guardrails, not obstacles. Once you run two or three batches, the process becomes routine.
— Ashley
Support your dog’s homemade diet with the right supplements
Cooking for your dog is only half the equation. Nutritional gaps in homemade meals are real, and the right supplements close them without complicating your routine. Mindfulbotany carries soft chew dog supplements formulated to complement homemade diets, covering key micronutrients that whole ingredients alone rarely provide in full. For owners who want a clean, convenient grooming option alongside their feeding routine, the Tropiclean Papaya and Coconut Waterless Shampoo is a practical addition to any at-home pet care setup. Browse the full Mindfulbotany catalog at mindfulbotany.market for products that support every aspect of your dog’s health.
FAQ
What is the correct protein-to-carb ratio for homemade dog food?
A common starting ratio for adult dogs is 40% protein, 30% carbohydrates, and 30% vegetables by weight. Adjust based on your dog’s age, weight, and activity level, and confirm ratios with your veterinarian.
Do I need supplements if I use high-quality whole ingredients?
Yes. Even high-quality ingredients rarely meet AAFCO or NRC nutrient profiles without added calcium, fish oil, and a canine multivitamin. Supplements are not optional for long-term health.
How long does homemade dog food last in the freezer?
Standard freezer storage lasts up to 3 months in airtight containers. Vacuum sealing extends this to up to 1 year at 0°F or below, though frost-free freezers require shorter timelines due to temperature cycling.
Can I mix homemade food with commercial kibble permanently?
Mixing is possible, but total daily calories and nutrients must be tracked across both foods. Simply topping kibble with homemade food without accounting for the full diet creates unpredictable nutrient ratios over time.
How do I know if my dog is tolerating the transition well?
Normal stools, consistent energy, and a healthy appetite are the key indicators. Loose stool, vomiting, or gas that persists beyond 2 days signals the transition pace is too fast. Slow down and consult your vet if symptoms continue.
Key takeaways
Balanced homemade dog food requires precise ingredient weighing, correct supplementation, safe storage, and a 7 to 14 day transition schedule to deliver consistent nutritional results.
| Point | Details |
|---|---|
| Weigh every ingredient | Use a digital scale in grams to prevent nutrient drift across batches. |
| Supplements are mandatory | Add fish oil and a canine multivitamin at serving time, not before freezing. |
| Cool food within 2 hours | Rapid cooling prevents bacterial growth in the food safety danger zone. |
| Transition over 7 to 14 days | Gradual ratio shifts prevent GI upset in roughly 1 in 3 dogs. |
| Vacuum seal for long storage | Vacuum-sealed portions stay safe and nutritious for up to 1 year at 0°F. |
Recommended
- Guide to safe ingredients for dogs: natural homemade recipes – Mindful Botany Market
- Feed your dog real food: a practical how-to guide – Mindful Botany Market
- Your dog food shopping checklist: Healthier picks made easy – Mindful Botany Market
- Step-by-step raw feeding for dogs: A complete how-to – Mindful Botany Market
0 comments